Best Lightroom Export Settings for Instagram, Websites, Facebook, Print, & More
Would you like to take the benefits of Lightroom to the next level by using an exceptional export setting that will not impact the quality of your photographs? Don’t worry! In this article, we’ll give a step-by-step guide on the best Lightroom export settings whether you want to export content for Instagram, Websites, Facebook or have a desire to print your photographs.

There is little difference in the export setting based on the purpose of your photograph usage, as each platform demands distinct formats, dimensions, and pixel specifications. By ignoring these critical requirements of a specific platform the quality of your images and videos will be compromised. Therefore, mastering the export settings of Lightroom is essential to ensure your creative work shines as brightly as envisioned.
Best Lightroom Export Settings for Instagram
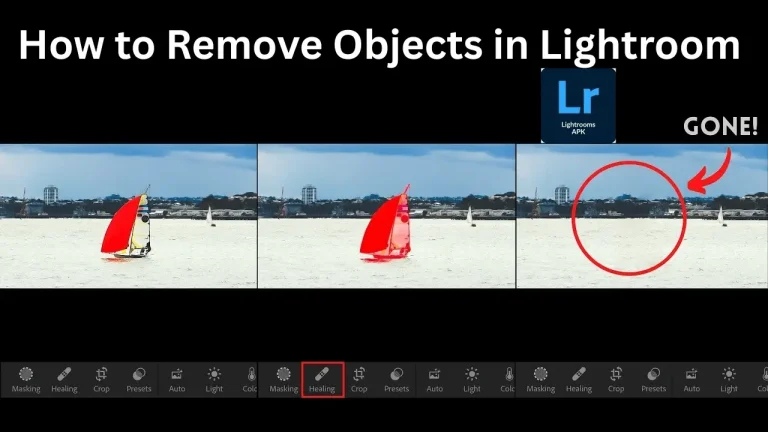
Do you think about why the saturation of your photographs reduces when you upload them on Instagram or why your image gets compressed after uploading? You may also wonder why the look of an image changes after uploading on Instagram and we don’t get the review that we were expecting. You can solve this complication just by using the best Lightroom export settings for Instagram if you’re editing your images on Lightroom:
Settings of Lightroom Mobile
- Open Lightroom MOD APK and edit the image that you want to upload on Instagram.
- When you’re satisfied with all the adjustments related to the image editing tab on the save option, a new pop-up box will appear with the Export option at the bottom.
- Click on Export and make adjustments in File Type, Dimension, Quality, and some more options as given below:
| File Type | JPG |
|---|---|
| Dimension | Select custom option. If your image is in landscape size then select Long Side 1080 pix and if you want to upload a portrait image on instagram then select Long Side 1350 pix. |
| Quality | 100% |
4. If you want to do some advanced settings, then click on “More Options,” where you can include a watermark and metadata just by enabling these options.
5.In this advanced setting you’ll find an option “Colour Space” that must be sRGB.
6. When all is done tab on Tick to save the settings.
After doing these export settings your image will not go into changes after uploading on Instagram.
Settings of Lightroom Classic
If you’re editing your photos on Lightroom Classic and want to export for uploading on Instagram, then you need to make the following adjustments:
| Export Location | |
| Export to | Desktop |
| Put in Subfolder | |
| Existing Files | Ask what to do |
| File Naming | |
| Rename to | Custom Name |
| Custom Text | |
| File Settings | |
| Image Format | JPEG |
| Quality | 100 |
| Colour Space | sRGB |
| Image Sizing | |
| Resize to Fit | Long Edge: 1080 (For landscape photo)Long Edge: 1350 (For portrait photo) |
| Resolution | 72 pixel per inch |
| Output Sharpening | |
| Sharpen for | Screen |
| Amount | Standard |
| Metadata | |
| Include | Copyright only |
| Watermarking | Don’t include watermarking |
| Post Processing | Do nothing |
Lightroom Export Settings for Facebook
There is a little difference in the export settings of Lightroom for mobile and desktop users because Lightroom Classic offers some advanced options that are not available on the Lightroom mobile app. Let’s explain these settings for the mobile app and desktop version in detail:
Exports Settings on Lightroom App
If you’re editing photos on Lightroom for uploading on Facebook, then you’ve to perform the following Export settings before sharing:
- When you’ve done the editing process completely then click on the share icon located at the upper right corner.
- Next, select the “Export to” option and make the following adjustments:
| File Type | JPG |
|---|---|
| Dimension | Choose a custom option and then select a 1200 pixel long edge for landscape photo and 1350 for portrait photo. |
| Quality | You can select 80-100 |
3. In more options, you need to select color space sRGB and then save settings by tapping on a tick positioned at the upper left corner.
Settings on Lightroom Classic
| Export Location | |
| Export to | Desktop |
| Put in Subfolder | |
| Existing Files | Ask what to do |
| File Naming | |
| Rename to | Custom Name |
| Custom Text | |
| File Settings | |
| Image Format | JPEG |
| Quality | 100 (65-80 Okay too) |
| Colour Space | sRGB |
| Image Sizing | |
| Resize to Fit | Long Edge: 1200 (For landscape photo)Long Edge: 1350 (For portrait photo) |
| Resolution | 240 pixel per inch |
| Output Sharpening | |
| Sharpen for | Screen |
| Amount | High |
| Metadata | |
| Include | Copyright only |
| Watermarking | Don’t include watermarking |
| Post Processing | Do nothing |
Lightroom Export Settings for Website
If you’re a blogger and freelancer and want to edit your images in Lightroom, then you don’t need to know the best Lightroom export settings on mobile because you’ll use a PC for this purpose. So you need to follow the following table to make adjustments in importing images for your website:
| Export Location | |
| Export to | Desktop |
| Put in Subfolder | Web |
| Existing Files | Ask what to do |
| File Naming | |
| Rename to | Custom Name |
| Custom Text | Web |
| File Settings | |
| Image Format | JPEG |
| Quality | 90 |
| Colour Space | sRGB |
| Image Sizing | |
| Resize to Fit | Long Edge: 2000(For landscape photo)Long Edge: 2040 (For portrait photo) |
| Resolution | 72 pixel per inch |
| Output Sharpening | |
| Sharpen for | Screen |
| Amount | Standard |
| Metadata | |
| Include | Copyright only |
| Watermarking | Don’t include watermarking |
| Post Processing | Do nothing |
Best Lightroom Export Settings for Print
Here is the detailed step-by-step guide for export settings if you want to get a print of a photograph instead of sharing it on social media.
For Lightroom Mobile
Most people use Lightroom Classic for editing the photos that they want to print. Still, sometimes, a professional photographer receives a client who may have a photo in his Lightroom mobile and asks to print that image. In that case following settings to export Lightroom photos from mobile for print will be very beneficial:
Lightroom Classic Export Settings for Print
| Export Location | |
| Export to | Desktop |
| Put in Subfolder | |
| Existing Files | Ask what to do |
| File Naming | |
| “Renaim to” will remain unchecked | |
| File Settings | |
| Image Format | TIFF |
| Compression | None |
| Colour Space | Adobe RGB(1998) |
| Bit Depth | 16 Bit /Component |
| Image Sizing | |
| Resize to Fit | Long Edge: 30.00 |
| Resolution | 300 |
| Output Sharpening | |
| Sharpen for | Glossy Paper |
| Amount | Standard |
| Metadata | |
| Include | Copyright only |
| Watermarking | Don’t include watermarking |
| Post Processing | Do nothing |
Lightroom Export Settings for Wedding Photos
If you’re a professional photographer and take photoshoots on wedding ceremonies then it’s likely that you’re using Lightroom Classic or CC on your PC. For your wedding photographs, you need to follow the following Lightroom export settings:
| Export Location | |
| Export to | Specific folder ( Give name to following by your client’s name) |
| Put in Subfolder | Folder that you created above by your client’s name |
| Existing Files | Ask what to do or Skip |
| File Naming | |
| Leave unchecked | |
| File Settings | |
| Image Format | JPEG |
| Quality | 80-100 |
| Colour Space | sRGB (best for online sharing) |
| Image Sizing | |
| Resize to Fit | Long Edge: 6000 pixels |
| Resolution | 300 pixels per inch (ppi) |
| Don’t Enlarge | Checked (prevents upscaling small files) |
| Output Sharpening | |
| Sharpen for | Screen or Matte Paper (depending on delivery) |
| Amount | Standard |
| Metadata | |
| Include | Copyright only |
| Watermarking | Optional (add branding, e.g., studio logo) |
| Post Processing | Do Nothing or Open in Explorer/Finder to review files |
How to Export a Catalog in Lightroom?
If you edited a wide range of images using the batch editing process of Lightroom and want to export all those photos in a time then you’ll use the Export As Catalog option of Lightroom. Then this catalog will help you to export photos and their related metadata in the form of a folder. To export photos in the form of the catalog, you need to follow the following steps:
Conclusion
Different photo editors are using Lightroom to handle different types of projects and requirements for each project are distinct from the other one. For instance, for wedding photographs, we need high resolution as compared to website images, and the same case is with other values for export settings. By keeping in view the intent of different users, we’ve covered the best Lightroom export settings for different categories of photographs based on our practical experience. So this tutorial is crucial whether you’re a web designer or a social media post designer.